FAMILY DIY Plank Sign Step by Step
Here is the step by step process of making this distressed FAMILY plank sign!! Keep in mind, there are many ways to do it, this is the way I completed this sign. You can buy the stencil, sign base and paints from my shop, just send me a message. info@rusticandrefined.ca
Let's start with the blank sign base - this one is 10.5" x 24", and is pine.
Dust off and sand if needed. Start by staining the board, I have used Minwax Waterbased stain in SLATE. I bought it at the local Home Hardware Store.
I used a lint free rag and rubbed it on. You can use a sponge or a brush, whatever works best for you. I chose to wear gloves to keep the mess to a minimum.
Once my board was stained, I set it aside to let it dry. It dries pretty quick if you just use a nice light coat. Remember to do the sides. I will do the back if I am making it for someone else, but this one is for a sample so I did not do the back.
Once boards are dry, lightly sand. Grab your Country Chic Paint in Simplicity, and get ready for some dry brushing. CCP is a clay based mineral paint, and a little goes a long way. It is water based as well, which makes for easy clean up, and quick drying if painted in light coats. I just used my CCP brush, you can use any brush you like. We are going to use the dry brush technique to add the Simplicity. 
These are all the CCP colors I used - Simplicity, Licorice and Dune Grass, the pink is discontinued, but you can use any light pink acrylic paint for the berries.
Now for the Dry Brush Technique...
I load my brush with very little paint, and then wipe my brush off on the edge of the paint container, then dab on a paper towel. With a very light touch, I will sweep the brush across the board, and then sweep back again. You can play around with it and add more or less paint to your brush. If you add too much, you may get blobs of paint in areas. I like to do the whole board, and then add cross hatch type brush strokes, going diagonally in both directions in areas. You can see some of the cross hatch strokes in the picture below.

While you are waiting for your board to dry, grab your stencil to prep it. I like to use my plastic scraper, but you can use a gift card to gently rub the front & back of the stencil, to help the stencil pieces stick to the transfer paper.
Once you have done both sides, flip the stencil so the blue side is down & the graph paper is up. Crease a corner, and gently start to peel back the paper. Go low & slow. Meaning - keep the paper low to the stencil as you pull back, don't pull up.


Hopefully no blue bits from your stencil stay stuck to the white paper, if this happens, just roll the paper back over the piece, and rub down, then start to pull back again. This is why it is important to go slow, those little loose bits can go crazy and just fly right off, ending up who knows where! (usually in my hair!)

Once you have successfully peeled off the backing, you can go ahead and place it on your board, sticky side down. Because it is sticky, you can't reposition the stencil after you have placed it on the board. So place it carefully, you may need an extra set of hands. For this stencil, I tried to line up most of my smaller letters of the word in the center board.

Once you have it places, grab your gift card and rub from the center out. Making sure to really stick the stencil to the board. The better it is stuck down, the less bleeding under the stencil. Now that you have it stuck down, go ahead and peel off the clear transfer paper off the front, you can go a little quicker than you did peeling off the backing. Now you have your stencil!!

There are lots of different ways to complete the next step - painting. Some people like to base coat in the same color as the board, in my case Simplicity, to eliminate a paint bleed. I have it down to where I just use a very light coat of paint, and reapply if necessary. I use a make up sponge, light pressure, and a very light application of paint.


You can see in the pic above, the left side I have started a second coat, the right side just has the one light coat. This would also be fine, as I am going for a distressed look. I am going to go ahead with the 2nd coat, and then lightly sand. You may be wondering where my wreath is, and I chose to not weed out the pieces so I don't mess up the paint.

I have used a safety pin to remove the wreath and small berry pieces. I can now go ahead and paint this section. I have used Dune Grass for the wreath, and I used a sponge for the most part. For the tight spaces close to the black, I used a brush - loaded up with very little paint. You can tape off these areas, or use the technique that works best for you.
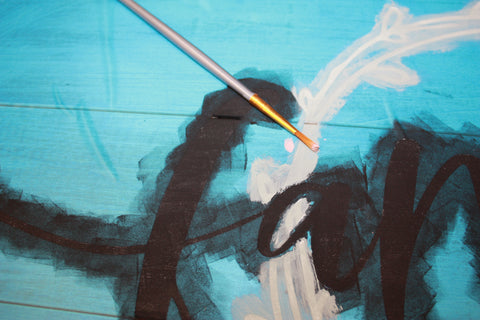
After the painting is completed, I let dry thoroughly - should be quick, we used light coats, right? Then I sanded, I mostly just sanded the word, and not too much. I just want some light fading in some areas.
Time to remove the stencil! My favorite part, I get to see what is hiding under the stencil. We are in the home stretch. I grab the top corner, and pull the stencil down, not across the board. I try to go against the grain, so any little wood fibers that have gotten stuck to my stencil don't get pulled the length of my board, thus wrecking all I have just done. I can go over that in another post - how to fix the pulled fibers. As well as, how to fix any paint bleeds. 
Now that the stencil is off, you may have noticed there are still some little bits stuck to the board. Grab a safety pin, or something with a sharp tip, and gently pick them out - do not gouge your board. (That will also be in the troubleshooting post I do!)
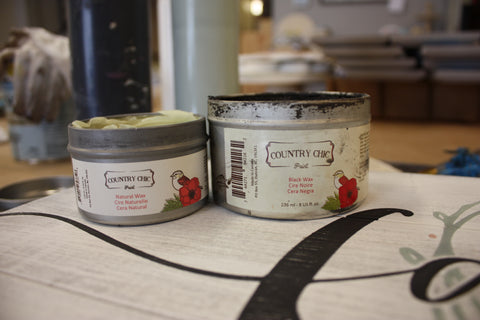
Now, there are many ways to distress your board even more. You can sand, you can glaze, you can wax. I am going to use Natural & Black wax to distress my board further. These are also made by Country Chic Paint. Totally safe to use indoors, there is no odor and very low to no VOC's in their products. I use both colors because if I apply too much of the black, the natural will help to erase it away. I base coat in the natural wax, then I go over in black, just in certain areas. Here I hit the edges a bit darker, and the creases of the boards. I used a lint free rag to apply, as well as wearing gloves - again to eliminate any wax under the fingernails.

Here is the dark wax showing in the corners. There is just enough of the gray stain showing through, and the black gets into the spaces where there is no paint. Once I am happy with the wax application, I let it dry, and then buff all over with a clean rag.

On the back to hang, I have applied 2 "D" rings and some wire. You can use whatever you like to hang your sign. If you buy from me, I include the rings, and wire.
All waxed up and ready to hang. I hope you have enjoyed this little tutorial. Please contact me if you'd like to purchase the kit (paint & wax is not included). Or if you have any questions, I can be reached at info@rusticandrefined.ca
Thanks for following along.
Lisa